Migration from Goolge Workspace to office 365
Migration from Google Workspace to office 365 is a tedious process and it involves many steps to ensure all emails, contacts, calendars, documents, and other data are transferred smoothly. Activities can be categorized into premigration activities, migration activities and post migration activities.
IT AMC services in Dubai play a crucial role in supporting businesses during the migration from Google Workspace to Office 365. Their experienced IT teams ensure a seamless transition by handling data migration, user account setup, email configuration, and application integration with minimal downtime. Additionally, they provide post-migration support and troubleshooting, ensuring that employees can quickly adapt to the new environment and continue working efficiently.
FSI information technology, IT AMC services provider and Cisco support in Dubai providing all these services.
Premigration Activities
Assess User Data and Permissions : We need to review the current setup, including email accounts, calendars, contacts, and documents for all users to understand the depth of migration and the volume of data to be migrated.
Verify Microsoft 365 Subscription: For this process, we need to ensure to have appropriate Microsoft 365 licenses is purchased for all users.
Create Users in Microsoft 365: We create corresponding user accounts in Microsoft 365 for all users . This is the beginning of migration to Microsoft 365.
Setup Microsoft 365 Migration Endpoint: At Last, We need to configure the migration endpoint in Office 365 to allow the transfer of data from Google Workspace to Microsoft 365.
Post-Migration Activities
Validate Data Transfer: Once the migration is done, we validate data transfer is completed without error by checking all emails, contacts, calendars, and other data have been migrate correctly for each user.
Configure Outlook/Office 365 for Each User: We set up Microsoft Outlook and ensure users can access their emails, calendars, and contacts in Microsoft 365. This is technically the result we need for the user after the migration.
Test Email Flow :Testing email ensures everything is working smoothly. This can be done by sending and receiving test email.
User Training and Support : It is a good practice to provide training to users on how to use Microsoft 365 which will give them basic nowledge about operatin the system and avoid confusion.
Now we would dive into the migrations steps
Migrations Steps
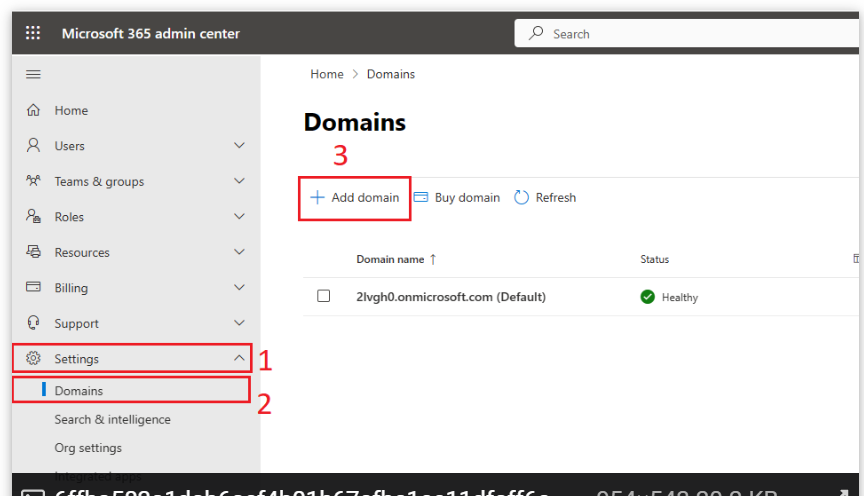
Step 1: ADD DOMAIN
- Login to Microsoft 365 admin center and start by adding the domain. While adding domain, we should not update the MX record instead just update the TXT record to verify the domain. This will help you will continue receiving email from google workspace accounts.
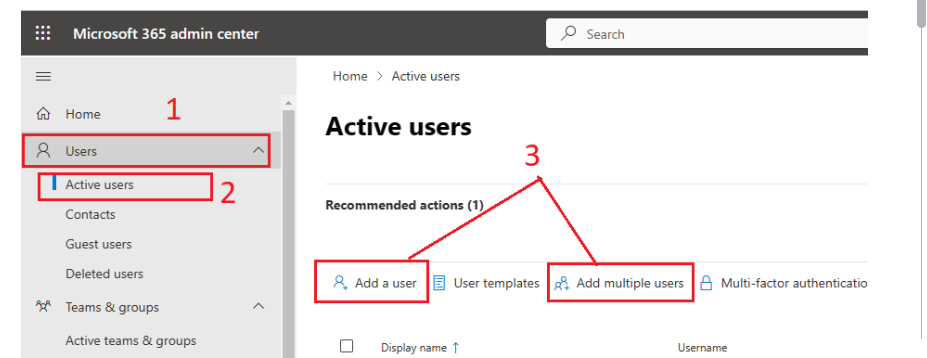
Step 2: Adding Users in Microsoft 365
- We can add the users one by one or multiple once user is added assign the License.
Step 3: Create a CSV file
- Create a CSV file with Email Address and User Name fields .
- If you are migrating the user to the same address, you do not need to create the User Name field.
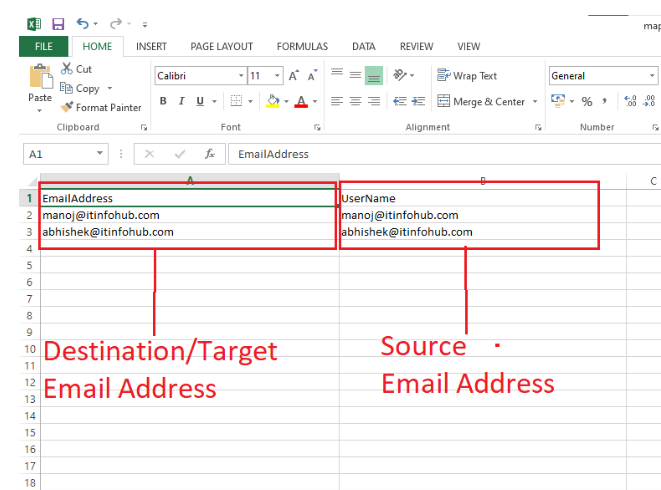
Step 4 : Create Migration Batch
- Open Exchange Admin Center, then click on Migration.
- Next click on Add migration batch to continue with the migration procedure.
- Provide a name for the migration batch, then choose Migrate to Exchange Online in the mailbox migration path and then click on the Next button
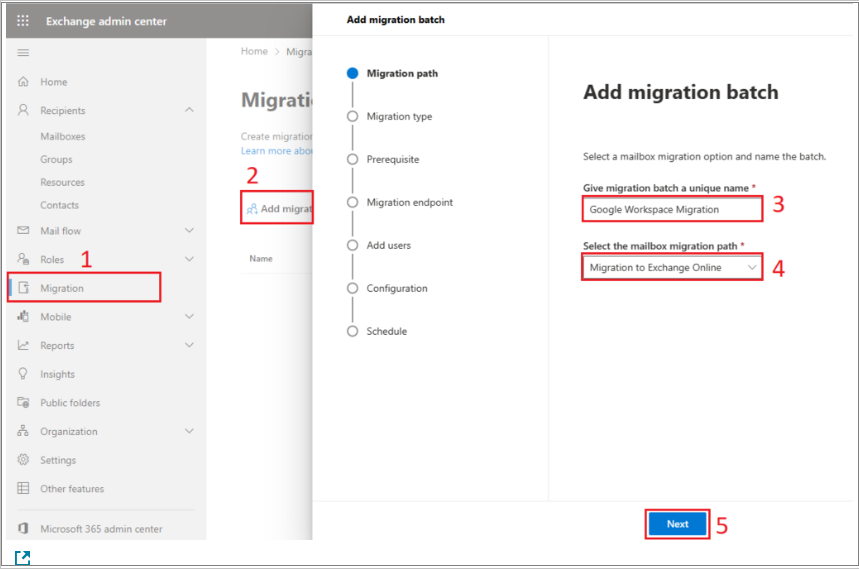
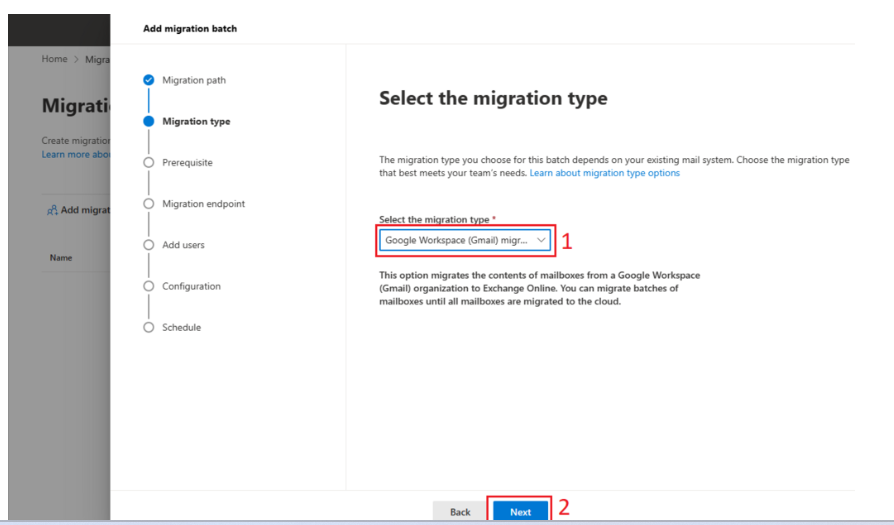
STEP 5: Select the Migration Type
- In the below window choose Google Workspace Migration as the migration type Once selected click on the Next button.
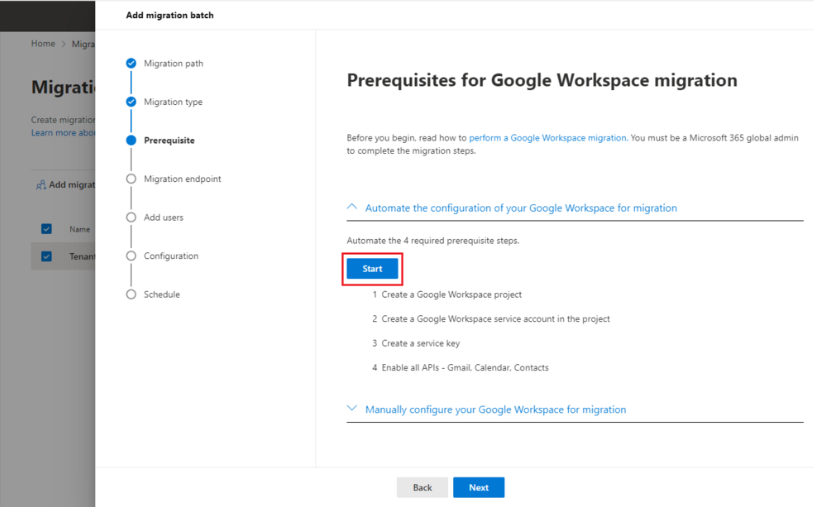
Step 6: Prerequisites for Google Workspace Migration
- There are two options for the configuration: one is manual, and the other is automatic. We will proceed with the automatic configuration. Expand the automate Google Workspace configuration and click on the start button, it will perform all the necessary tasks as shown below.
Step 7: Automatic Configuration Completed
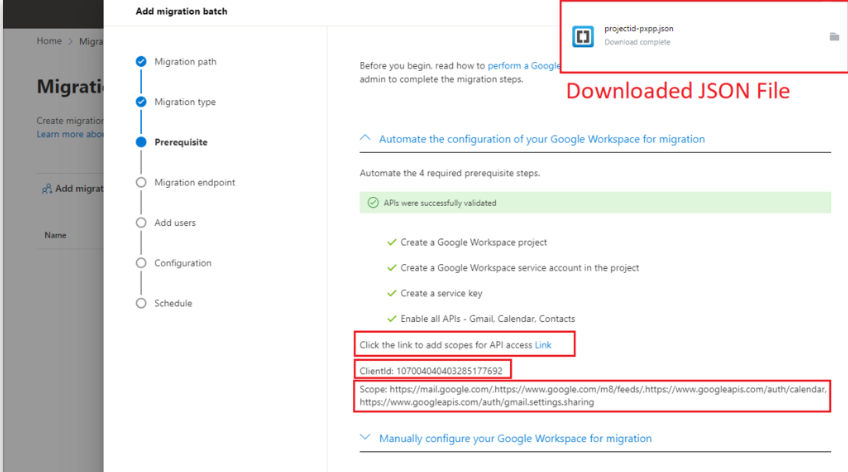
- Once automatic configuration is completed, it will show you the client ID, scopes, a link to add the scopes and a secret key will be downloaded automatically.
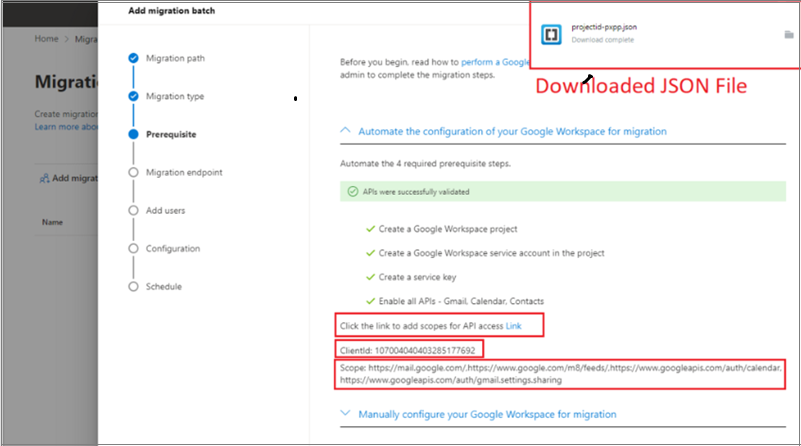
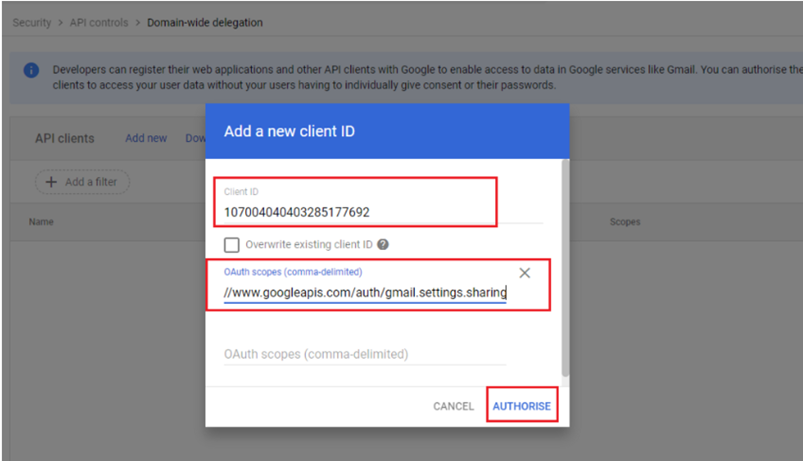
Step 8: Add domain Wide Delegation
- Visit the link provided below to add the scopes.
- Then click on “Add New” option, paste the client ID and Scopes value,
and click on the “Authorize” button.
STEP 9: Visit the Migration Tab Again
- Once all the above steps have been completed, click on the “Next” button to proceed further with the migration process
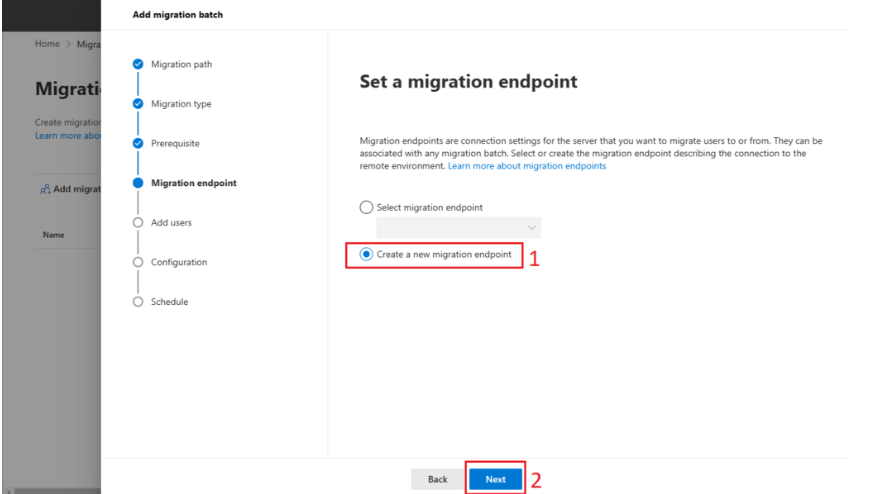
Step 10: Create Migration Endpoint
- In the Set a Migration Endpoint window, choose “Create a new migration endpoint”
- click on the “Next” button.
Step 11: Add Migration Endpoint Information
- Now, provide a name for the Migration Endpoint
- leave other things as they are, and press the “Next” button
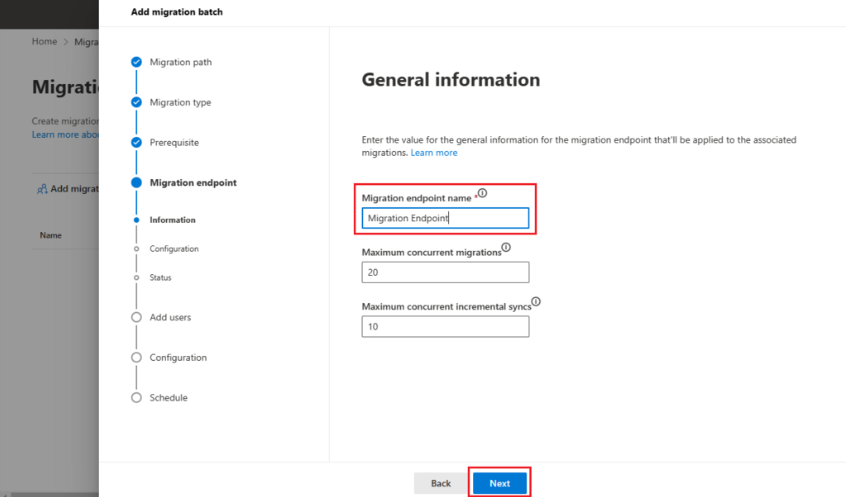
Step 12: Configure the Migration Endpoint
- Enter the email address of the Google Workspace account that you have authorised earlier to create the service project.
- Import the JSON file that was downloaded earlier
and click on the “Next” button
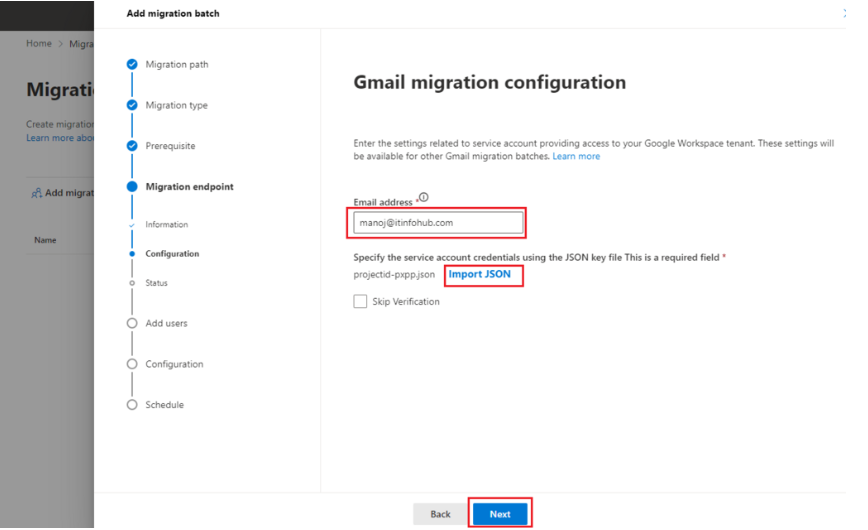
Step 13 : Status of the Migration Endpoint
- It will verify all the details and show you the status of the Migration Endpoint.
- If everything is correct, it will show the status as “New endpoint created.”
Click on the “Next” button to continue further
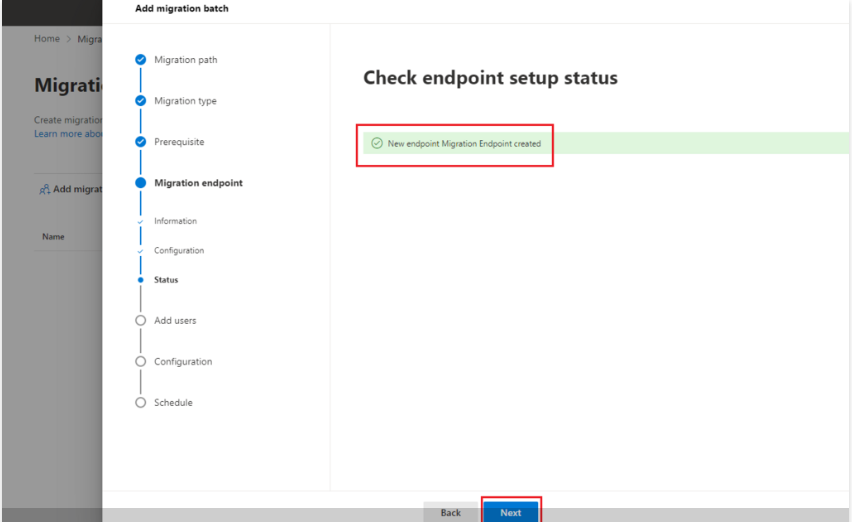
Step 14: Add User Mailboxes
- In This step click on Import CSV file and upload the CSV file that we created earlier.
- Click on the Next button
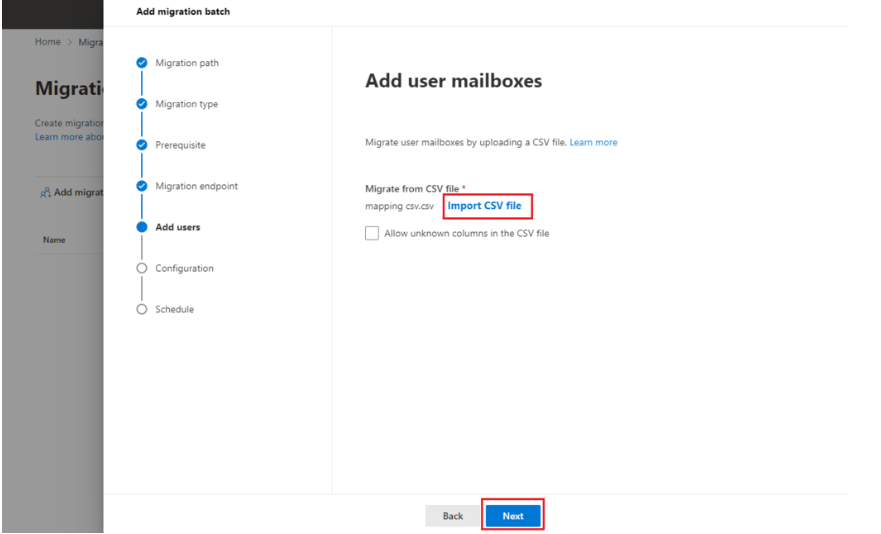
Step 14: Configure the Migration
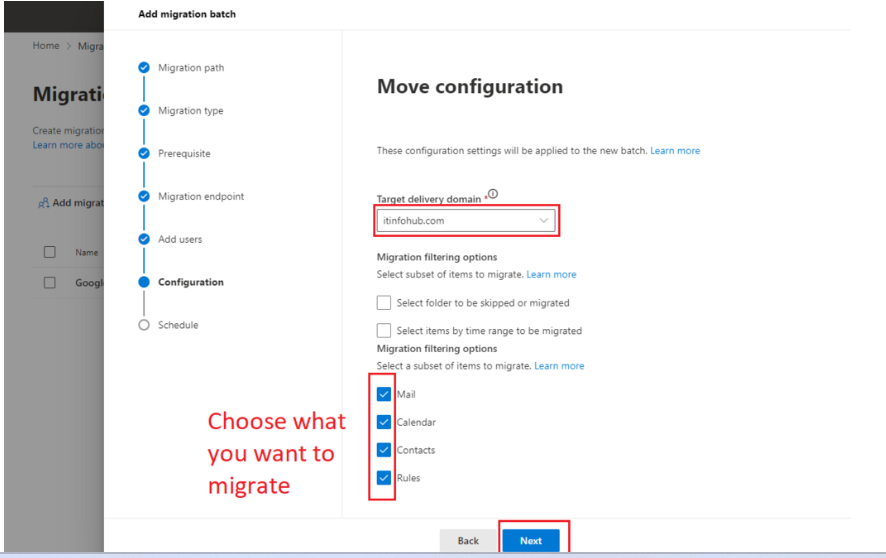
- In the Target Delivery Domain option choose the domain
in which you are migrating mailboxes and select what you need to migrate,
such as emails, contacts, calendars, and rules. - Once done, click on the Next button.
Note: If you are unable to select the delivery domain, just type the delivery domain address and press Enter
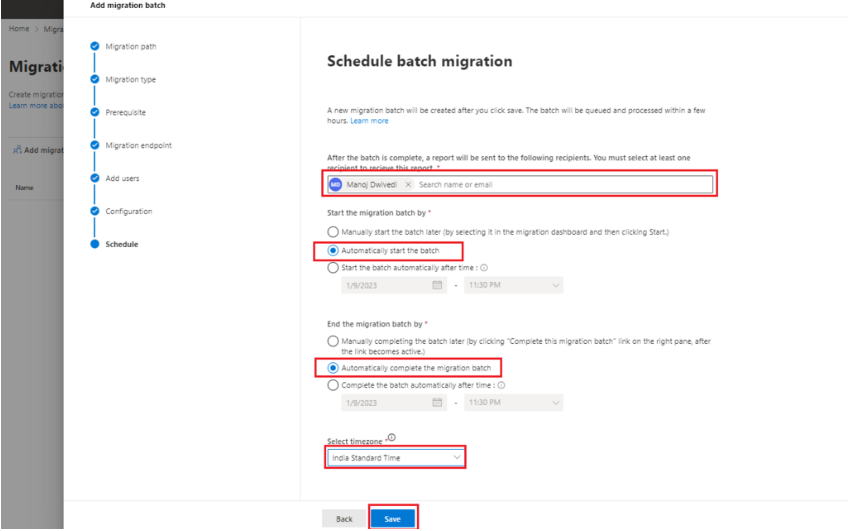
Step 16: Schedule Migration Batch
- Select the email address in which you want to get the migration report.
- Choose “Automatically Start the Batch” in the “Start the migration batch” field.
- In the End the migration batch field select Automatically end the batch.
- Select your timezone and click on the Save button
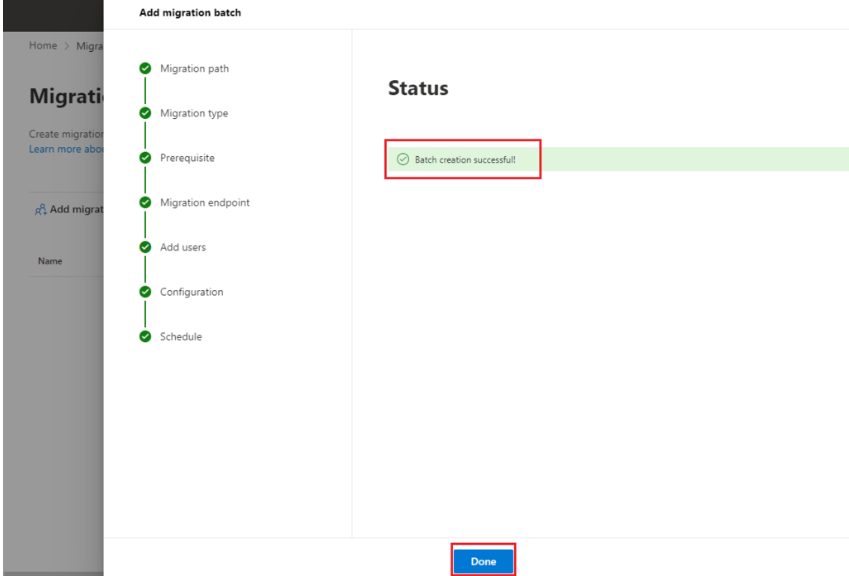
Step 17: Status of Migration Batch
- Within a few seconds you will see the status of the migration batch.
- If everything is correct it will show Batch Creation Successful.
- Click on the Done button
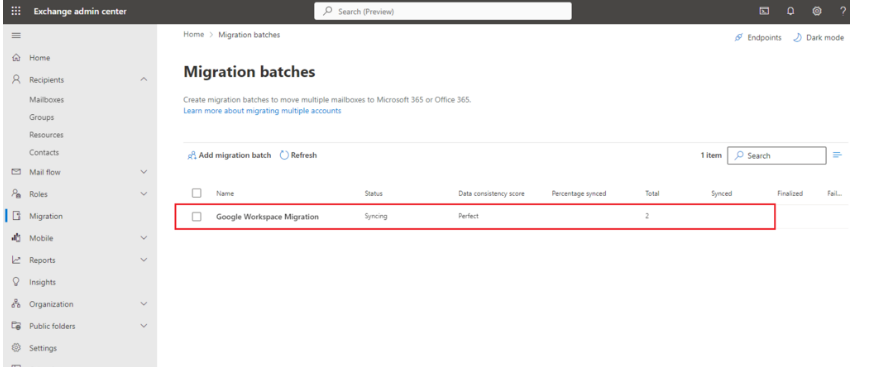
Step 18: Migration Batch Syncing
- In the migration window you can see the batch you created is listed and it is in the syncing phase
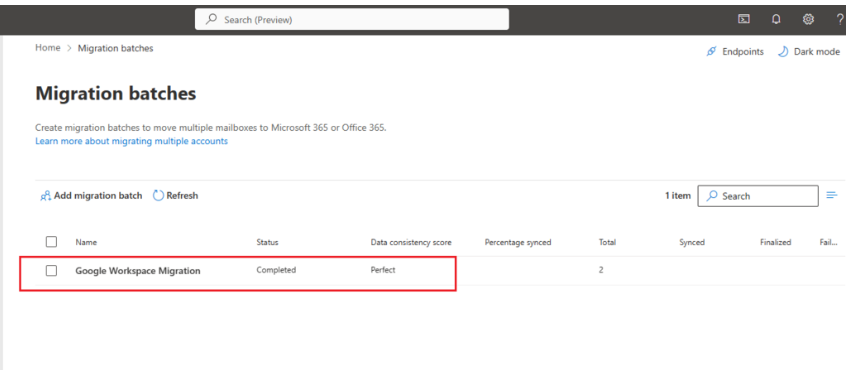
Step 19: Migration Batch Completion
- It takes few minutes to hours to complete the migration batch. It is totally depending on the data size you have in Google Workspace mailbox. Once completed it will show you the status as completed
Step 20: Update MX Record
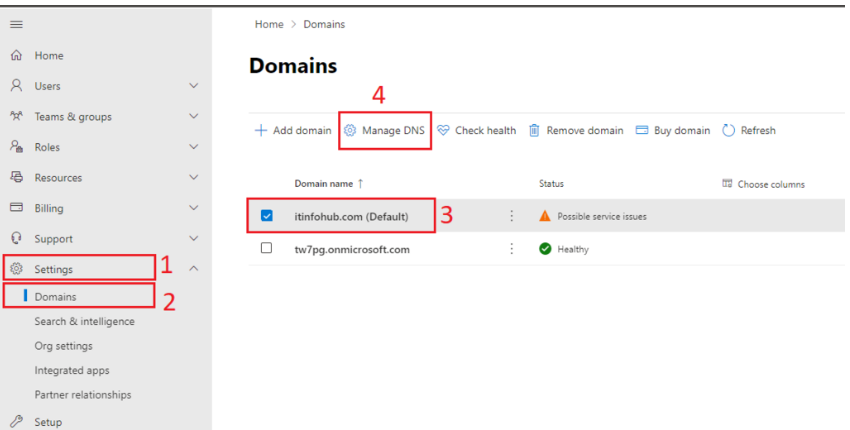
Once the migration has been completed,you need to update the MX records to start sending/receiving emails in the new Microsoft 365 mailbox.
